
Dear all !
Well, actually, there is no term „Azure Service Account“ in Microsoft Azure, it is called an App with a Service Principal. So whenever you want to access Azure Resources programmatically, (i.e. via REST), you probably do not want to use a persons Usernam/Password combination, you want to use a GUID, dedicated for a particulat reason.
This App, then only has access the the resources you want, so you can fine-grane security very easily. You can do this in the Azure Portal, as described here:
https://docs.microsoft.com/en-us/azure/azure-resource-manager/resource-group-create-service-principal-portal
If you do need to do this more often, Powershell is probably the better way.
STEP 1: Set your Azure tenant
|
1 2 |
Import-Module AzureAD $tenantid = '12345678-105d-437c-0000-eacfa183c31d' |
So you see we use the AzureAD module in version 2.0.0.0 or higher, which should be installed on your system. The module is available on the PowerShell Gallery, so a simple „Install-Module AzureAD“ in a PowerShell Session with administrative rights should work.
Step 2: Authenticate to your tenant
|
1 |
Connect-AzureAD -TenantId $tenantid |
Tipp: The Connect-AzureAD commandlet will ask you for credentials, nevertheless if you are logged in already with Login-AzureRMAccount
If we look into our Azure portal ==> Azure Active Directory ==> App registration its pretty empty here.
![]()
Step 3: Define the AppID settings
|
1 2 3 4 5 6 7 |
$appName = "PSAppID" $appURI = "https://$appName.azurewebsites.net" $appHomePageUrl = "https://$appName.home.azurewebsites.net" $appReplyURLs = @($appURI, $appHomePageURL, "https://$appName") if (!($myApp = Get-AzureADApplication -Filter "DisplayName eq '$($appName)'" -ErrorAction SilentlyContinue)) { $myApp = New-AzureADApplication -DisplayName $appName -IdentifierUris $appURI -Homepage $appHomePageUrl -ReplyUrls $appReplyURLs } |
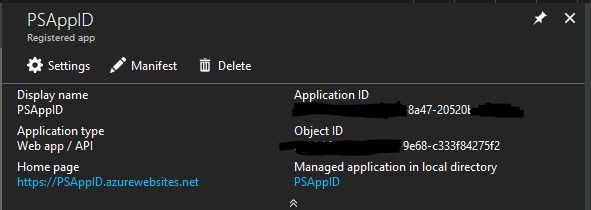
Some notes on the code above. Our AppID´s Name is PSAppID. You need to set a URI and also a reply URI, otherwise the creation of the Service principal in the next step will not work.
Tipp: It does not matter if the websites if $appURI, $appHomepage, $appReplyURL really exist, they just need to be filled with reasonable values and $appURI and $AppHomepageURL MUST NOT be identical.
After defining the variables, the script checks if the App is already available, and if not creates it.
Step 4: Create the Service Principal
|
1 |
New-AzureADServicePrincipal -AppId $myApp.AppId -DisplayName $appName |
This command now finally creates the „Service Account“, which is in Azure Terms the Service Principal.
Tipp: Without this step yuo are not able to create an AppKey (= Password) to use this AppID to authenticate to Azure.
Lets look into the Portal, what we created so far:
Step 5: Create a Password (AppKey) for the new AppID
Each AppKey has a lifetime in years, and there is also an unlimited option. In our example below we generate a Key with a 1 year lifetime.
|
1 2 3 |
$startDate = Get-Date $endDate = $startDate.AddYears(1) $aadAppKeyPwd = New-AzureADApplicationPasswordCredential -ObjectId $myApp.ObjectId -CustomKeyIdentifier "Primary" -StartDate $startDate -EndDate $endDate |
Tipp: Store the AppKey which resides in $appKey.Value in a secure place and DO IT NOW! The AppKey will not be safed anywhere else and is gone after you close the PS Session.
Thats it – Now you have an AppID/AppKey, just done with PowerShell!
Regards/Roman